Showing posts with label Princess of the Crystal. Show all posts

Tuesday, August 18, 2015

Otakon Review (2015)

This year for Otakon my DH finally agreed to just let fate lead us instead of trying to plan every minute and get to every panel.  I have to say, this was the best year yet.

Friday, I wore my Princess of the Crystal cosplay.  That one was so much fun and I got a ton of compliments because not many people have seen cosplayers do this character. Plus, it's just fun to wear a big flowing skirt.

This was my first time wearing circle lenses and I have to say that I'm hooked.  They were just as comfortable as my regular contacts and definitely put the final touch on the cosplay. These are the Vassen Cloud Nine Pink from PinkyParadise.com. You can't really see it in the picture, but in real life my eyes were obviously pink.


There is a garden terrace at the Baltimore Convention Center that is great for taking pictures and a lot of cosplayers hang out there, because photographers like to go there and just shoot.  While we were there the author of Cosplay in America, Ejen Chuang, took my picture!  Although I don't think he's posted it anywhere, it's still an honor to even be asked, since he's seen and worked with so many great cosplayers.

I also finally got a picture with Yaya Han on Friday.  Usually the line for her booth is hours long, but we walked up and were only the 3rd people in line.  It was glorious.  She's such an inspiration.


Saturday, I was Esdeath from Akame Ga Kill. Two awesome things happened on Saturday.  The first was that we were interviewed by a journalist from Vice Magazine for an article about cosplay and anime in the black community.  That was just a case of being in the right place at the right time.  We were early for my first professional photoshoot and were just waiting around, when we were approached by the journalist and her photographer.  How serendipitous was that!!  If you want to read the article I've linked it here.


For Esdeath I'm wearing the Vassen Cloud Nine Blue circle lenses also from PinkyParadise and they were just as comfortable and vivid as the pink ones.


The second awesome thing was my first professional photoshoot. I have to shoutout Ash B Images for the amazing photos that I've posted here..   If you like her work, you can check out her Facebook page, by clicking her name.


Registration was low this year for Otakon, which is of course bad for the convention, but it was great for us because it was much easier to get around and I just feel like I was able to pay more attention to cosplay since my line of sight wasn't being overloaded.  I do hope, however, that they are able to get the numbers that they want next year.  I love to see my favorite conventions succeed.

I also made two new friends at this convention, which is always a great thing and a few of us are planning a group cosplay.  There will be more about that in the next post though.

To see more pictures of my cosplays check out my DH's photography Facebook page at Tarou Studios. If you like s work, message him and maybe he'll take some pics for you at our next convention.

Happy cosplay!

Friday, July 17, 2015

Work Log: Princess of the Crystal (Mawaru Penguindrum) #4


Today I made her very decorative penguin hat. I started with a basic fleece hat in all black.  I used the Fleece Beanie Hat tutorial from CrafyGemini on YouTube.  Not only was it super easy to make, but she includes a PDF pattern to make it even easier.  The only thing that I did differently was that I didn't add on the cuff like she does.  I used her pattern to get the circumference correct, but my cuff was not as tall as hers.  I also added a small triangle to the front so that when I sewed on the white trim, I could bring it down to form a point just like the Princess's hat.


For the "ears" on the hat I drew triangles to the shape that I wanted and cut 4 out of the black fleece (2 for each ear). I used a stiff iron-on interfacing, cut to the same size and shape as the ears and ironed that on before sewing the ears together on two sides (right sides together).  Then I flipped them right side out.  Using CraftyGemini's tutorial you would sew two separate halves of the hat, before putting the whole thing together, so I did that first step, then I sandwiched the ears between the two halves and sewed the hat together, that way the ears were easily part of the hat without me having to cut any holes.

The beak is two triangles of yellow gold cotton sewn together on two sides, then flipped right side out and stuffed with poly-fill. To close the back of it, I just cut a small rectangle out of some cardboard, pressed it down a little to cover the poly-fil and then hot glued the sides of the fabric to the cardboard making sure that all edges were attached and the poly-fill was totally covered.  Then I just used fabric glue to attach it to the hat.

The eyes are made of a light pink craft foam and then a glittery dark pink craft foam that I found at Walmart.  The glitter craft foam had a sticky back so I didn't need to use glue to attach it to the light pink.  Then I used fabric glue to attach them to the hat.

For the "wings" I cut the shape out of craft foam, and covered it front and back with Plasti-Dip to seal it and make it sturdy.  Because I only had white Plasti-Dip on hand, I painted the front and back with a couple of coats of yellow acrylic paint.  I used Velcro dots to attach this to the hat so that I could remove the wings during travel, since they stick out from the sides.


The green "jewel" is just a fake jewel I found in a pack from Michaels glue on to a piece of yellow fleece and the smaller yellow jewel is also from a different pack from Michaels.  I used Gem-Tac to attach those and since that takes 24 hours to dry well, I actually put them on last.
 
The white trim under the wings and around the back is the same eyelet that I used for the scarf and on the bottom of the bodice, sewn on with my machine.


 For the "tassels" on both sides here's what I did. . .
1. I cut four pieces of yellow cotton to 4" wide by 22" tall.  The length was what I estimated from it's placement on the hat, down to my natural waist.  I cut a curve at one end of each piece, because the bottom of hers are rounded.

2. I sewed two pieces together (right sides together) on three sides, which includes the curved end.

3. For the large white beads I actually used 2" round Styrofoam balls.  I had previously used 3-5 layers of Modge Podge to seal them before painting on 2-3 coats of white acrylic paint and then sealing one more time just for the shine.  The tear-drop bead at the bottom and gold beads are actual beads that I found I the jewelry-making section at Michaels.

4. I used a thick twine, also from the jewelry-making section at Michaels, to string all of those together, and then used a big-eyed needle and sewed that whole thing to the center of the curved end of the yellow "tassel".


5. Lastly I stuffed the "tassel" with a few inches of polyfill just to make it a little "3D" because hers wasn't flat and then sewed them onto the hat under the eyelet trim.


That took a lot of steps and planning, but I actually like the way it turned out and it fits!

The last things I need to do are make her fluffy arm cuffs, and then go back to my Esdeath cosplay and finish the thigh highs for that.  I'm so close to finished, whew.

I'm sorry I don't have more pictures of the process.  I get so focused on working that I don't think about it until the piece is completed.  I'm going to try to do better when I start working on my cosplays for my next convention.

Happy Cosplay!!

Tuesday, July 14, 2015

Work Log: Princess of the Crystal (Mawaru Penguindrum) #3

Today I made the skirt of this cosplay.  After a lot of thinking I realized it's just a long circle skirt.  My measurements from my natural waist to floor, while wearing the bustle cage and my heels is 47".  I'm measuring at my natural waist, instead of where I usually measure, because the top of the skirt will be hidden by the bodice.

The hardest part of this was cutting it out and the long seams.  (I hate long seams because I get so bored, lol).  I had to tape 6 pieces of my large graph paper together and get my DH's help to draw the pattern, then instead of using the quarter-sized pattern, I folded that in half so that my pattern was an eighth, meaning it would take 8 pieces using that pattern to make the skirt.


I cut the pattern out 6 times in the red fabric and 6 times in the black.  6 pieces, because it's open front so I didn't need to make a fully round skirt.  The fabric I used for this is just quilter's cotton. The black was the cheapest black that I could find and the red was the one that I thought was the best color choice.  I sewed the red skirt together first and ended up only using 5 pattern pieces and that fit me exactly the way I wanted it to. It was probably my typical bad measuring that made the pieces big enough for that, lol.  I didn't finish the edges because I already had a plan for that.

Before putting the black together I made the ruffles.  These are also made from cheap quilter's cotton.  I cut the fabric to the length I needed (with 1/2" seam allowance) and double the height so that I could fold it in half and not have to worry about hemming the exposed edge.  I made 4 sets of 4" pleated ruffles.

When I sewed the 5 black pattern pieces together, I sewed one ruffle between pieces 2 and 3 and then another between pieces 3 and 4 so that they are evenly spaced in the back.  For the front two ruffles I pinned the completed red and black sections right sides together and sandwiched the ruffles on the inside, and sewed the sides and the bottom, leaving the top (waist) open.  Once everything was sewed in place I flipped the skirt right sides out. Now it's hemmed and I only have raw edges at the top.

For the waist band I made a tube that is 1.75" tall and fits around my hips comfortably.  I closed of the top 1.25" of the tube to make a casing for the elastic.  I inserted a piece of elastic small enough that it would hold on my waist, but stretchy enough so that I could pull it over my hips, then using the remaining 1/2" of the waistband I attached it to the skirt.  The front 10" of the waist band don't have any skirt attached. I then used my serger to finish the raw edges at the top of the skirt and on the waistband.  You could also use a zigzag stitch.


 After trying the skirt on, it is the perfect length and very comfortable because the cotton is so light.  I don't know what I'll work on tomorrow yet, but it'll probably be the hat.

Happy Cosplaying!

Monday, July 13, 2015

Work Log: Princess of the Crystal (Mawaru Penguindrum) #2


Today I made the scarf and armwarmers for this cosplay and started the bustle cage for the skirt. 

The scarf was very easy since it's just a purple tube stuffed with some polyfill.  I added snaps to the front so that I could put it around my neck instead of trying to figure out how to get it over my big head, lol.  The pink scarf is just a rectangle that I sewed together, flipped right side out and then closed the hole.  It just gets tied on.  Her purple neckwarmer, has what I took to be more eyelet attached around it.  I used the same eyelet that's on the bodice by just sewing it into the seam as I sewed the purple part into a tube that I then flipped right side out and filled.


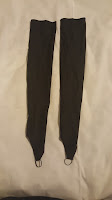
The armwarmers are really basic.  I ended up making 3 trials before I made one I liked.  They're made out of stretch nylon, it's basically swimwear/dancewear material that has a 4-way stretch.  I cut the fabric to the exact width of my arm so that when I sewed it with a 1/2" seam allowance it would stretch and fit my arm without elastic.  For the tube length I measured about 1" down onto my hand, then added on a triangle for the finger part and hand sewed in a piece of 1/8" elastic for the fingerloop.


For the bustle cage I used this Bustle Cage tutorial that I found on Pinterest. I used 1/4" pex pipe that I got from Home Depot and red Duck tape because I want it to camouflage with the inside of my skirt which will be red. I also added a second row of pipe in the middle of the cage.  The pex pipe was pretty flexible but didn't really hold it's shape, so my DH later warmed it with a heat gun and gave it a little more roundness.  This was a little time-consuming to get right, but I wanted to have that done so I can put it on when I measure for the skirt.

Tomorrow I'll sew her open-front ball gown skirt and hopefully finish it tomorrow.

Happy Cosplaying!!


Saturday, July 11, 2015

Work Log: Princess of the Crystal (Mawaru Penguindrum) #1

Yesterday I started and finished the bodice for my Princess of the Crystal cosplay for Otakon.  I'm super shocked that I managed to complete it in one day.


The day before, I spent the day making samples and doing trial and error with muslin.  I started with a cheap Strapless Top pattern from Etsy during my research.  I made one out of muslin in my suggested size and it fit perfectly, but was shorter in the front that I wanted, so for my final product I just added 3 inches to the front.

The next step was the figure out how to add the points to the front (and back).  I made sample after sample, never quite getting them to fit correctly.  It would look good, but because I was just making the top longer, there wasn't any flare to accommodate my hips.  Then I had the epiphany that I could just modify a peplum and everything fell into place.

I used the How to Sew a Peplum tutorial from It's Always Autumn that I already had pinned on Pinterest and voilĂ  my pattern was complete.  So I started yesterday afternoon and by the end of the night I had completed the top.

I used 1/2" gold metallic bias tape for the gold trim, the bottom white trim is eyelet trim and the white lines across the front are 1/4" twill tape. I have to go back to Hancock a buy two more buttons for the bottom row, because I thought I already had two, but didn't.  I am however, done!

Next I'll be working on the black armwarmers and the puffy white cuffs she has on. I'm sort of procrastinating to avoid figuring out the skirt, but I'll most likely start that tomorrow. I have an idea for making the skirt puff out like hers, but I'll get to that in another post.

Happy Cosplaying!!